> ## Documentation Index
> Fetch the complete documentation index at: https://runpod-b18f5ded-public-endpoints.mintlify.site/llms.txt
> Use this file to discover all available pages before exploring further.
# Deploy a vLLM worker
Learn how to deploy a large language model (LLM) using Runpod's preconfigured vLLM workers. By the end of this guide, you'll have a fully functional API endpoint that you can use to handle LLM inference requests.
## What you'll learn
In this tutorial, you'll learn how to:
* Configure and deploy a vLLM worker using Runpod's Serverless platform.
* Select the appropriate hardware and scaling settings for your model.
* Set up environmental variables to customize your deployment.
* Test your endpoint using the Runpod API.
* Troubleshoot common issues that might arise during deployment.
## Requirements
* You've [created a Runpod account](/get-started/manage-accounts).
* You've created a [Runpod API key](/get-started/api-keys).
* You've installed [Python](https://www.python.org/downloads/).
* (For gated models) You've created a [Hugging Face access token](https://huggingface.co/docs/hub/en/security-tokens).
## Step 1: Choose your model
First, decide which LLM you want to deploy. The vLLM worker supports most Hugging Face models, including:
* Llama 3 (e.g., `meta-llama/Llama-3.2-3B-Instruct`)
* Mistral (e.g., `mistralai/Ministral-8B-Instruct-2410`)
* Qwen3 (e.g., `Qwen/Qwen3-8B`)
* OpenChat (e.g., `openchat/openchat-3.5-0106`)
* Gemma (e.g., `google/gemma-3-1b-it`)
* Deepseek-R1 (e.g., `deepseek-ai/DeepSeek-R1-Distill-Qwen-7B`)
* Phi-4 (e.g., `microsoft/Phi-4-mini-instruct`)
For this walkthrough, we'll use `openchat/openchat-3.5-0106`, but you can substitute this with [any compatible model](https://github.com/runpod-workers/worker-vllm?tab=readme-ov-file#compatible-model-architectures).
## Step 2: Deploy using the Runpod console
The easiest way to deploy a vLLM worker is through the Runpod console:
1. Navigate to the [Serverless page](https://www.console.runpod.io/serverless).
2. Under **Quick Deploy**, find **Serverless vLLM** and click **Configure**.
3. In the deployment modal:
* Select a vLLM version (latest stable recommended).
* Under **Hugging Face Models**, enter your model: `openchat/openchat-3.5-0106`.
* If using a gated model, enter your **Hugging Face Token**.
* Click **Next**.
4. In the vLLM settings modal, under **LLM Settings**:
* Set **Max Model Length** to `8192` (or an appropriate context length for your model).
* Leave other settings at their defaults unless you have specific requirements.
* Click **Next**.
5. In the endpoint configuration modal:
* Under **Worker Configuration**:
* Set **Active Workers** to `0` for cost savings or `1` for faster response times.
* Set **Max Workers** to `2` (or higher for more concurrent capacity).
* Set **GPU Count** to `1` (increase for larger models).
* Leave other settings at their defaults unless you have specific requirements.
* Click **Deploy**.
Your endpoint will now begin initializing. This may take several minutes while Runpod provisions resources and downloads your model.
For more details on how to optimize your endpoint, see [Endpoint configurations](/serverless/endpoints/endpoint-configurations).
## Step 3: Understand your endpoint
While your endpoint is initializing, let's understand what's happening and what you'll be able to do with it:
* Runpod is creating a Serverless endpoint with your specified configuration.
* The vLLM worker image is being deployed with your chosen model.
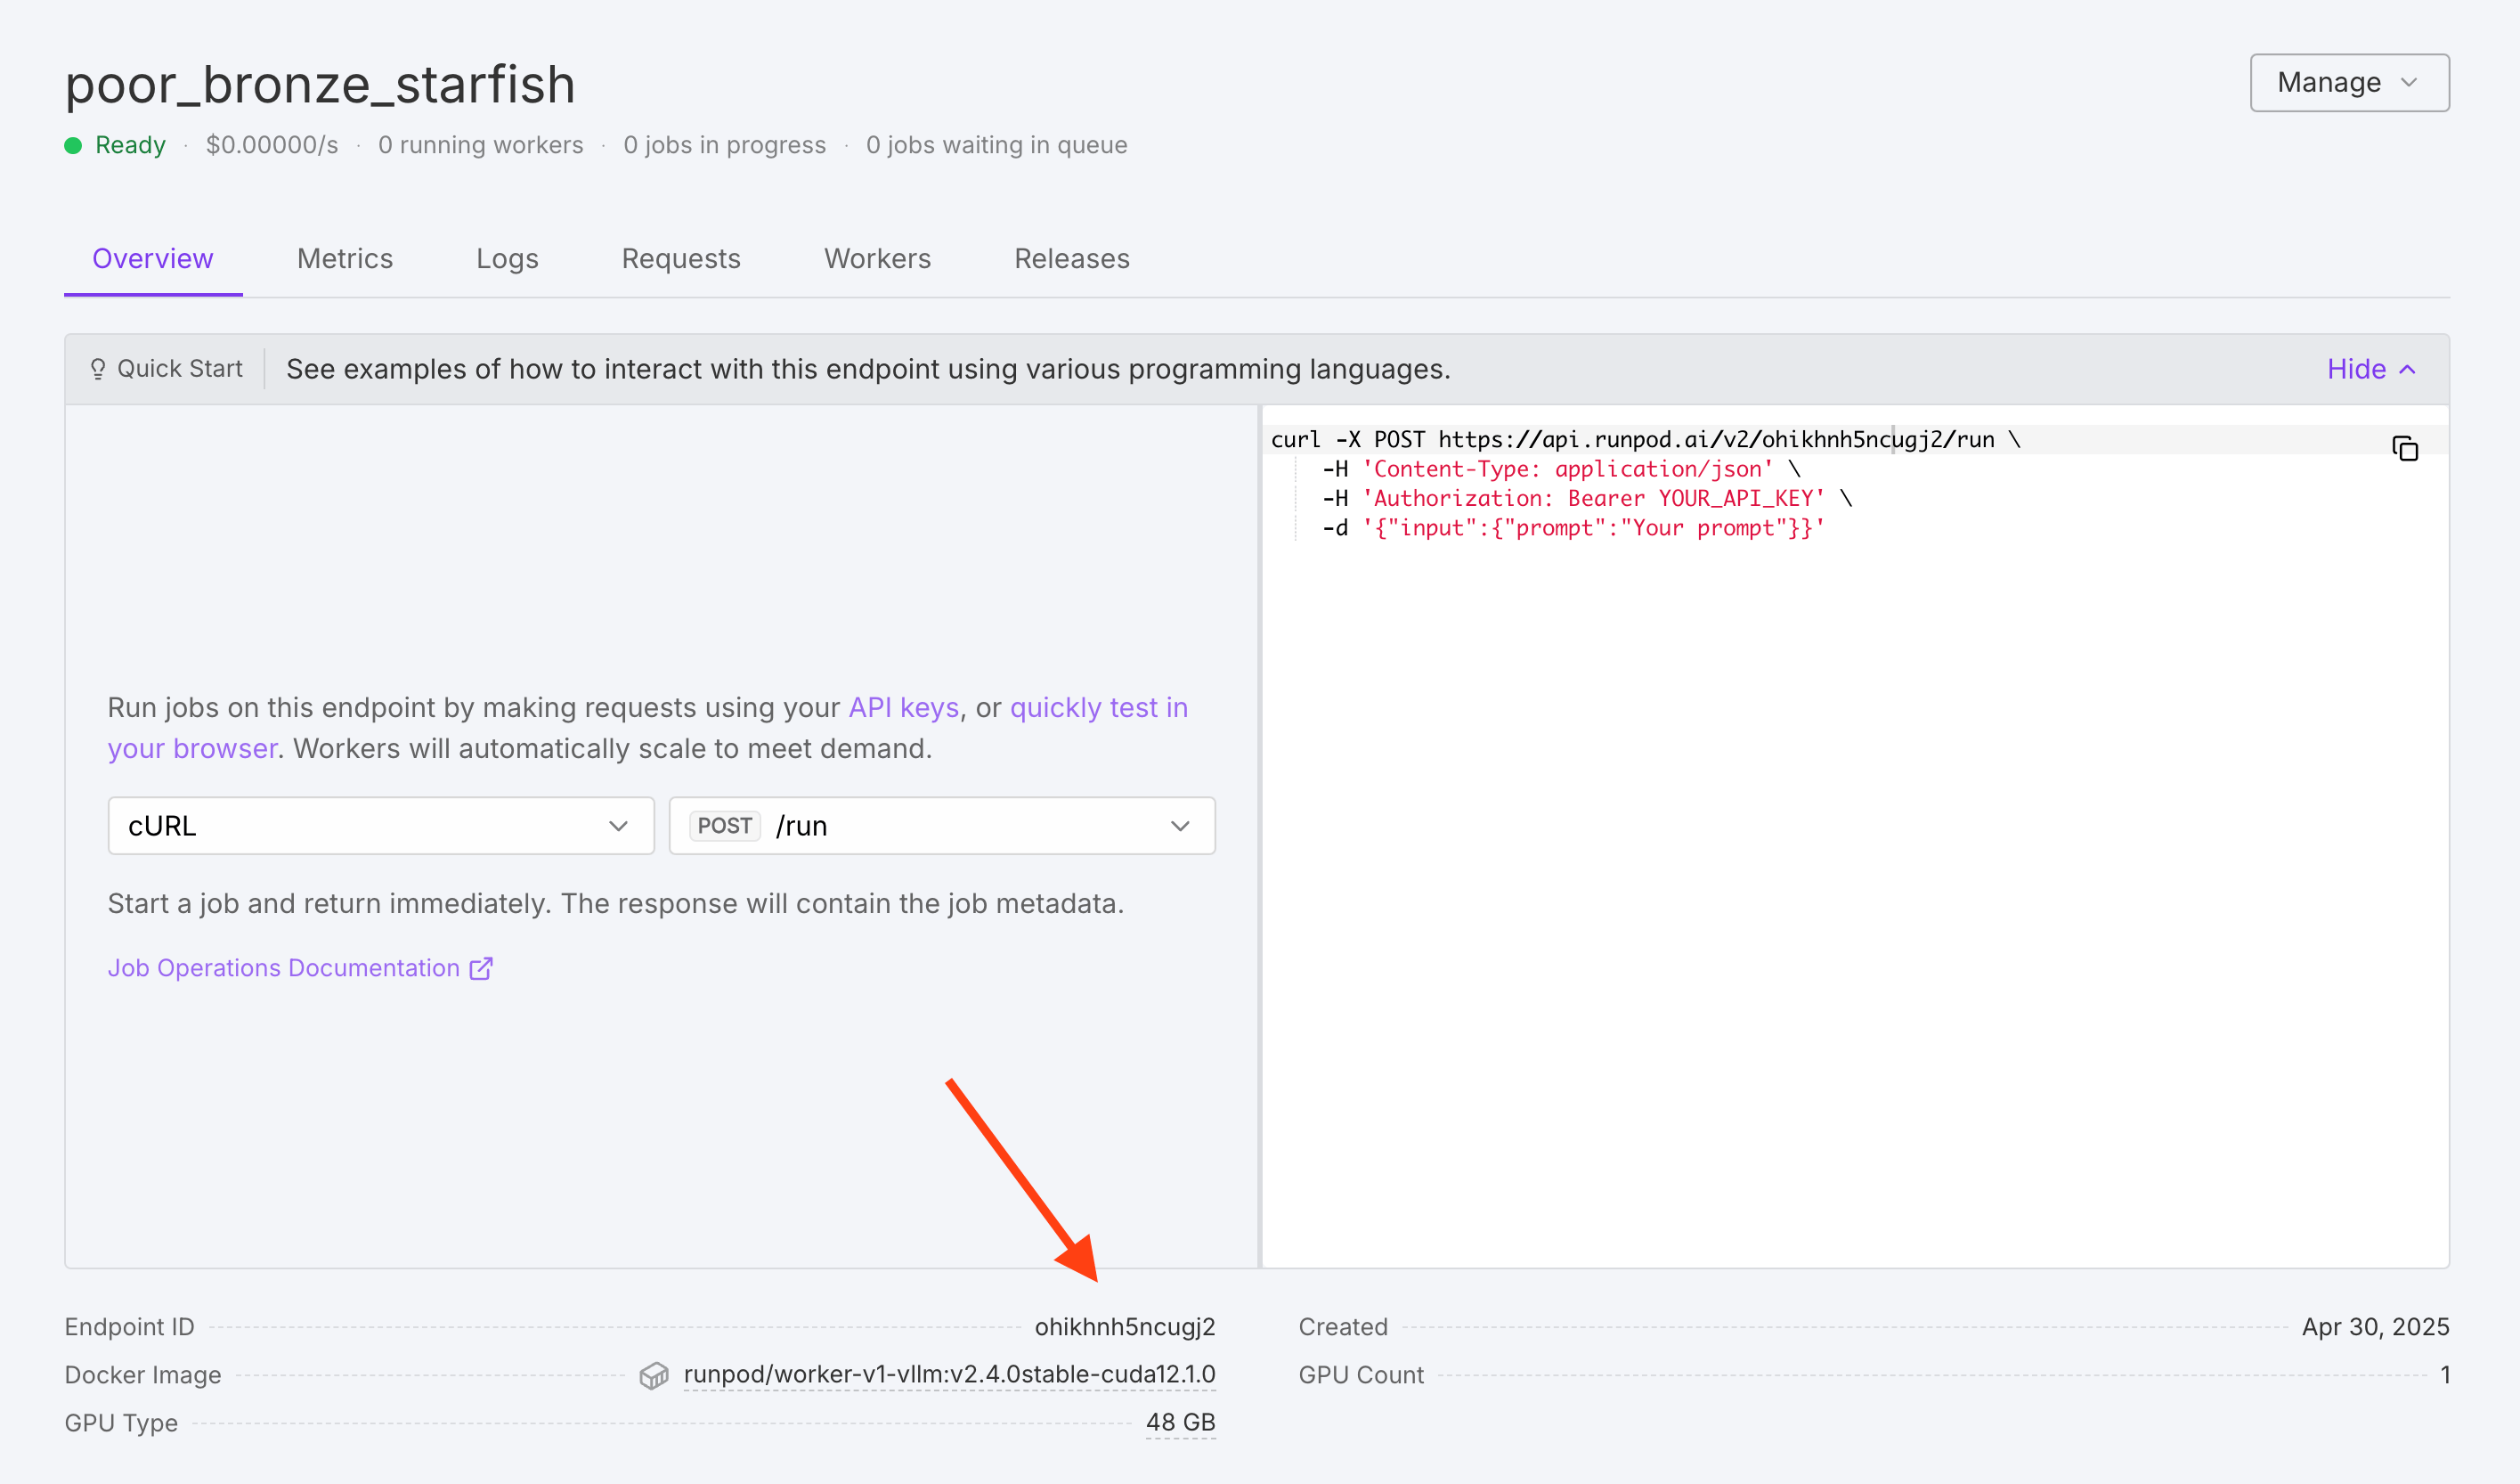
Once deployment is complete, make a note of your **Endpoint ID**. You'll need this to make API requests.
 ## Step 4: Send a test request
To test your worker, click the **Requests** tab in the endpoint detail page:
## Step 4: Send a test request
To test your worker, click the **Requests** tab in the endpoint detail page:
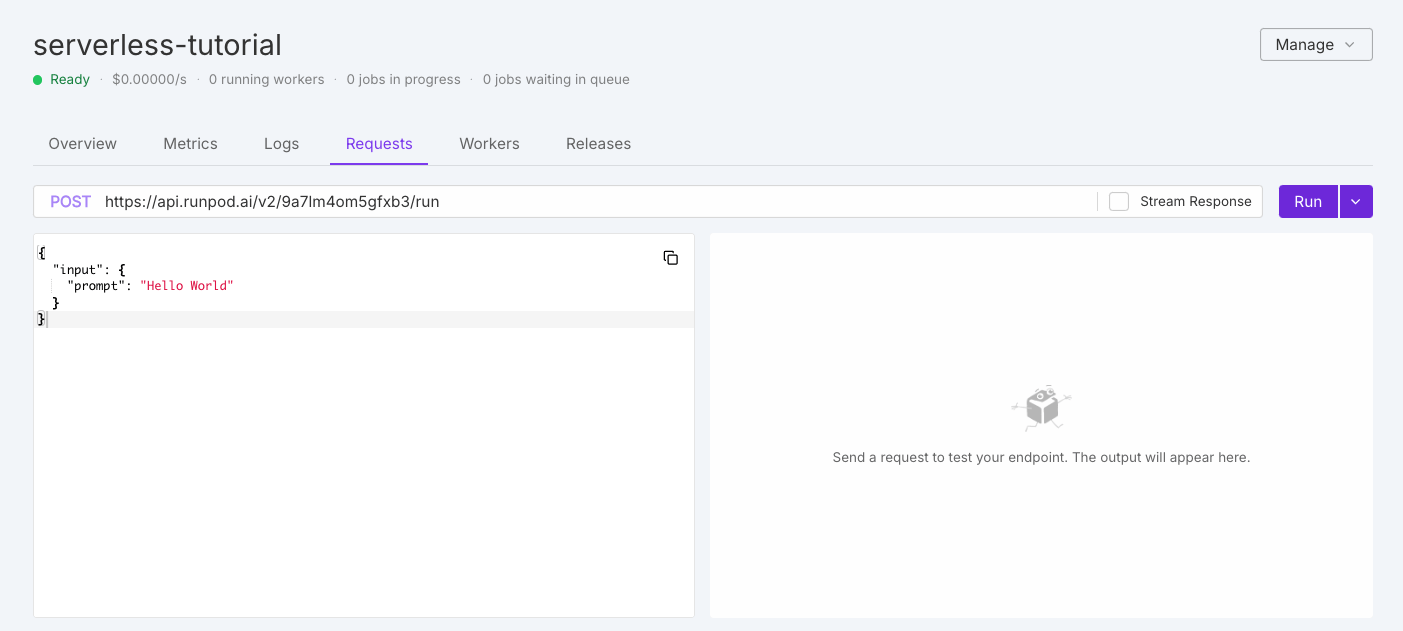 On the left you should see the default test request:
```json theme={"system"}
{
"input": {
"prompt": "Hello World"
}
}
```
Leave the default input as is and click **Run**. The system will take a few minutes to initialize your workers.
When the workers finish processing your request, you should see output on the right side of the page similar to this:
```json theme={"system"}
{
"delayTime": 638,
"executionTime": 3344,
"id": "f0706ead-c5ec-4689-937c-e21d5fbbca47-u1",
"output": [
{
"choices": [
{
"tokens": ["CHAT_RESPONSE"]
}
],
"usage": {
"input": 3,
"output": 100
}
}
],
"status": "COMPLETED",
"workerId": "0e7o8fgmm9xgty"
}
```
## Step 5: Customize your model (optional)
If you need to customize your model deployment, you can edit your endpoint settings to add environment variables. Here are some useful environment variables you might want to set:
* `MAX_MODEL_LEN`: Maximum context length (e.g., `16384`)
* `DTYPE`: Data type for model weights (`float16`, `bfloat16`, or `float32`)
* `GPU_MEMORY_UTILIZATION`: Controls VRAM usage (e.g., `0.95` for 95%)
* `CUSTOM_CHAT_TEMPLATE`: For models that need a custom chat template
* `OPENAI_SERVED_MODEL_NAME_OVERRIDE`: Change the model name to use in OpenAI requests
To add or modify environment variables:
1. Go to your endpoint details page.
2. Select **Manage**, then select **Edit Endpoint**.
3. Expand the **Public Environment Variables** section.
4. Add/edit your desired variables.
5. Click **Save Endpoint**.
You can find a full list of available environment variables in the [vLLM worker GitHub README](https://github.com/runpod-workers/worker-vllm?tab=readme-ov-file#environment-variablessettings).
You may also wish to adjust the input parameters for your request. For example, use the `max_tokens` parameter to increase the maximum number of tokens generated per reponse. To learn more, see [Send vLLM requests](/serverless/vllm/vllm-requests#request-input-parameters).
## Troubleshooting
If you encounter issues with your deployment:
* **Worker fails to initialize**: Check that your model is compatible with vLLM and your GPU has enough VRAM.
* **Slow response times**: Consider using a more powerful GPU or optimizing your request parameters.
* **Out of memory errors**: Try increasing GPU size or reducing `MAX_MODEL_LEN`.
* **API errors**: Verify your endpoint ID and API key are correct.
## Next steps
Congratulations! You've successfully deployed a vLLM worker on Runpod's Serverless platform. You now have a powerful, scalable LLM inference API that's compatible with both the OpenAI client and Runpod's native API.
Next you can try:
* [Sending requests using the Runpod API.](/serverless/vllm/vllm-requests)
* [Learning about vLLM's OpenAI API compatibility.](/serverless/vllm/openai-compatibility)
* [Customizing your vLLM worker's handler function.](/serverless/workers/handler-functions)
* [Building a custom worker for more specialized workloads.](/serverless/workers/custom-worker)
On the left you should see the default test request:
```json theme={"system"}
{
"input": {
"prompt": "Hello World"
}
}
```
Leave the default input as is and click **Run**. The system will take a few minutes to initialize your workers.
When the workers finish processing your request, you should see output on the right side of the page similar to this:
```json theme={"system"}
{
"delayTime": 638,
"executionTime": 3344,
"id": "f0706ead-c5ec-4689-937c-e21d5fbbca47-u1",
"output": [
{
"choices": [
{
"tokens": ["CHAT_RESPONSE"]
}
],
"usage": {
"input": 3,
"output": 100
}
}
],
"status": "COMPLETED",
"workerId": "0e7o8fgmm9xgty"
}
```
## Step 5: Customize your model (optional)
If you need to customize your model deployment, you can edit your endpoint settings to add environment variables. Here are some useful environment variables you might want to set:
* `MAX_MODEL_LEN`: Maximum context length (e.g., `16384`)
* `DTYPE`: Data type for model weights (`float16`, `bfloat16`, or `float32`)
* `GPU_MEMORY_UTILIZATION`: Controls VRAM usage (e.g., `0.95` for 95%)
* `CUSTOM_CHAT_TEMPLATE`: For models that need a custom chat template
* `OPENAI_SERVED_MODEL_NAME_OVERRIDE`: Change the model name to use in OpenAI requests
To add or modify environment variables:
1. Go to your endpoint details page.
2. Select **Manage**, then select **Edit Endpoint**.
3. Expand the **Public Environment Variables** section.
4. Add/edit your desired variables.
5. Click **Save Endpoint**.
You can find a full list of available environment variables in the [vLLM worker GitHub README](https://github.com/runpod-workers/worker-vllm?tab=readme-ov-file#environment-variablessettings).
You may also wish to adjust the input parameters for your request. For example, use the `max_tokens` parameter to increase the maximum number of tokens generated per reponse. To learn more, see [Send vLLM requests](/serverless/vllm/vllm-requests#request-input-parameters).
## Troubleshooting
If you encounter issues with your deployment:
* **Worker fails to initialize**: Check that your model is compatible with vLLM and your GPU has enough VRAM.
* **Slow response times**: Consider using a more powerful GPU or optimizing your request parameters.
* **Out of memory errors**: Try increasing GPU size or reducing `MAX_MODEL_LEN`.
* **API errors**: Verify your endpoint ID and API key are correct.
## Next steps
Congratulations! You've successfully deployed a vLLM worker on Runpod's Serverless platform. You now have a powerful, scalable LLM inference API that's compatible with both the OpenAI client and Runpod's native API.
Next you can try:
* [Sending requests using the Runpod API.](/serverless/vllm/vllm-requests)
* [Learning about vLLM's OpenAI API compatibility.](/serverless/vllm/openai-compatibility)
* [Customizing your vLLM worker's handler function.](/serverless/workers/handler-functions)
* [Building a custom worker for more specialized workloads.](/serverless/workers/custom-worker)