> ## Documentation Index
> Fetch the complete documentation index at: https://runpod-b18f5ded-public-endpoints.mintlify.site/llms.txt
> Use this file to discover all available pages before exploring further.
# Get started with Runpod
> Create an account and deploy your first GPU.
If you're new to Runpod, follow this guide to learn how to create an account, deploy your first GPU Pod, and use it to execute code remotely.
## Step 1: Create an account
Start by creating a Runpod account to access GPU Pods and Serverless compute resources:
1. [Sign up here](https://www.console.runpod.io/signup).
2. Verify your email address.
3. Set up two-factor authentication (recommended for security).
## Step 2: Deploy a Pod
Now that you've created your account, you're ready to deploy your first Pod:
1. Open the [Pods page](https://www.console.runpod.io/pods) in the web interface.
2. Click the **Deploy** button.
3. Select **RTX 2000 Ada** from the list of graphics cards.
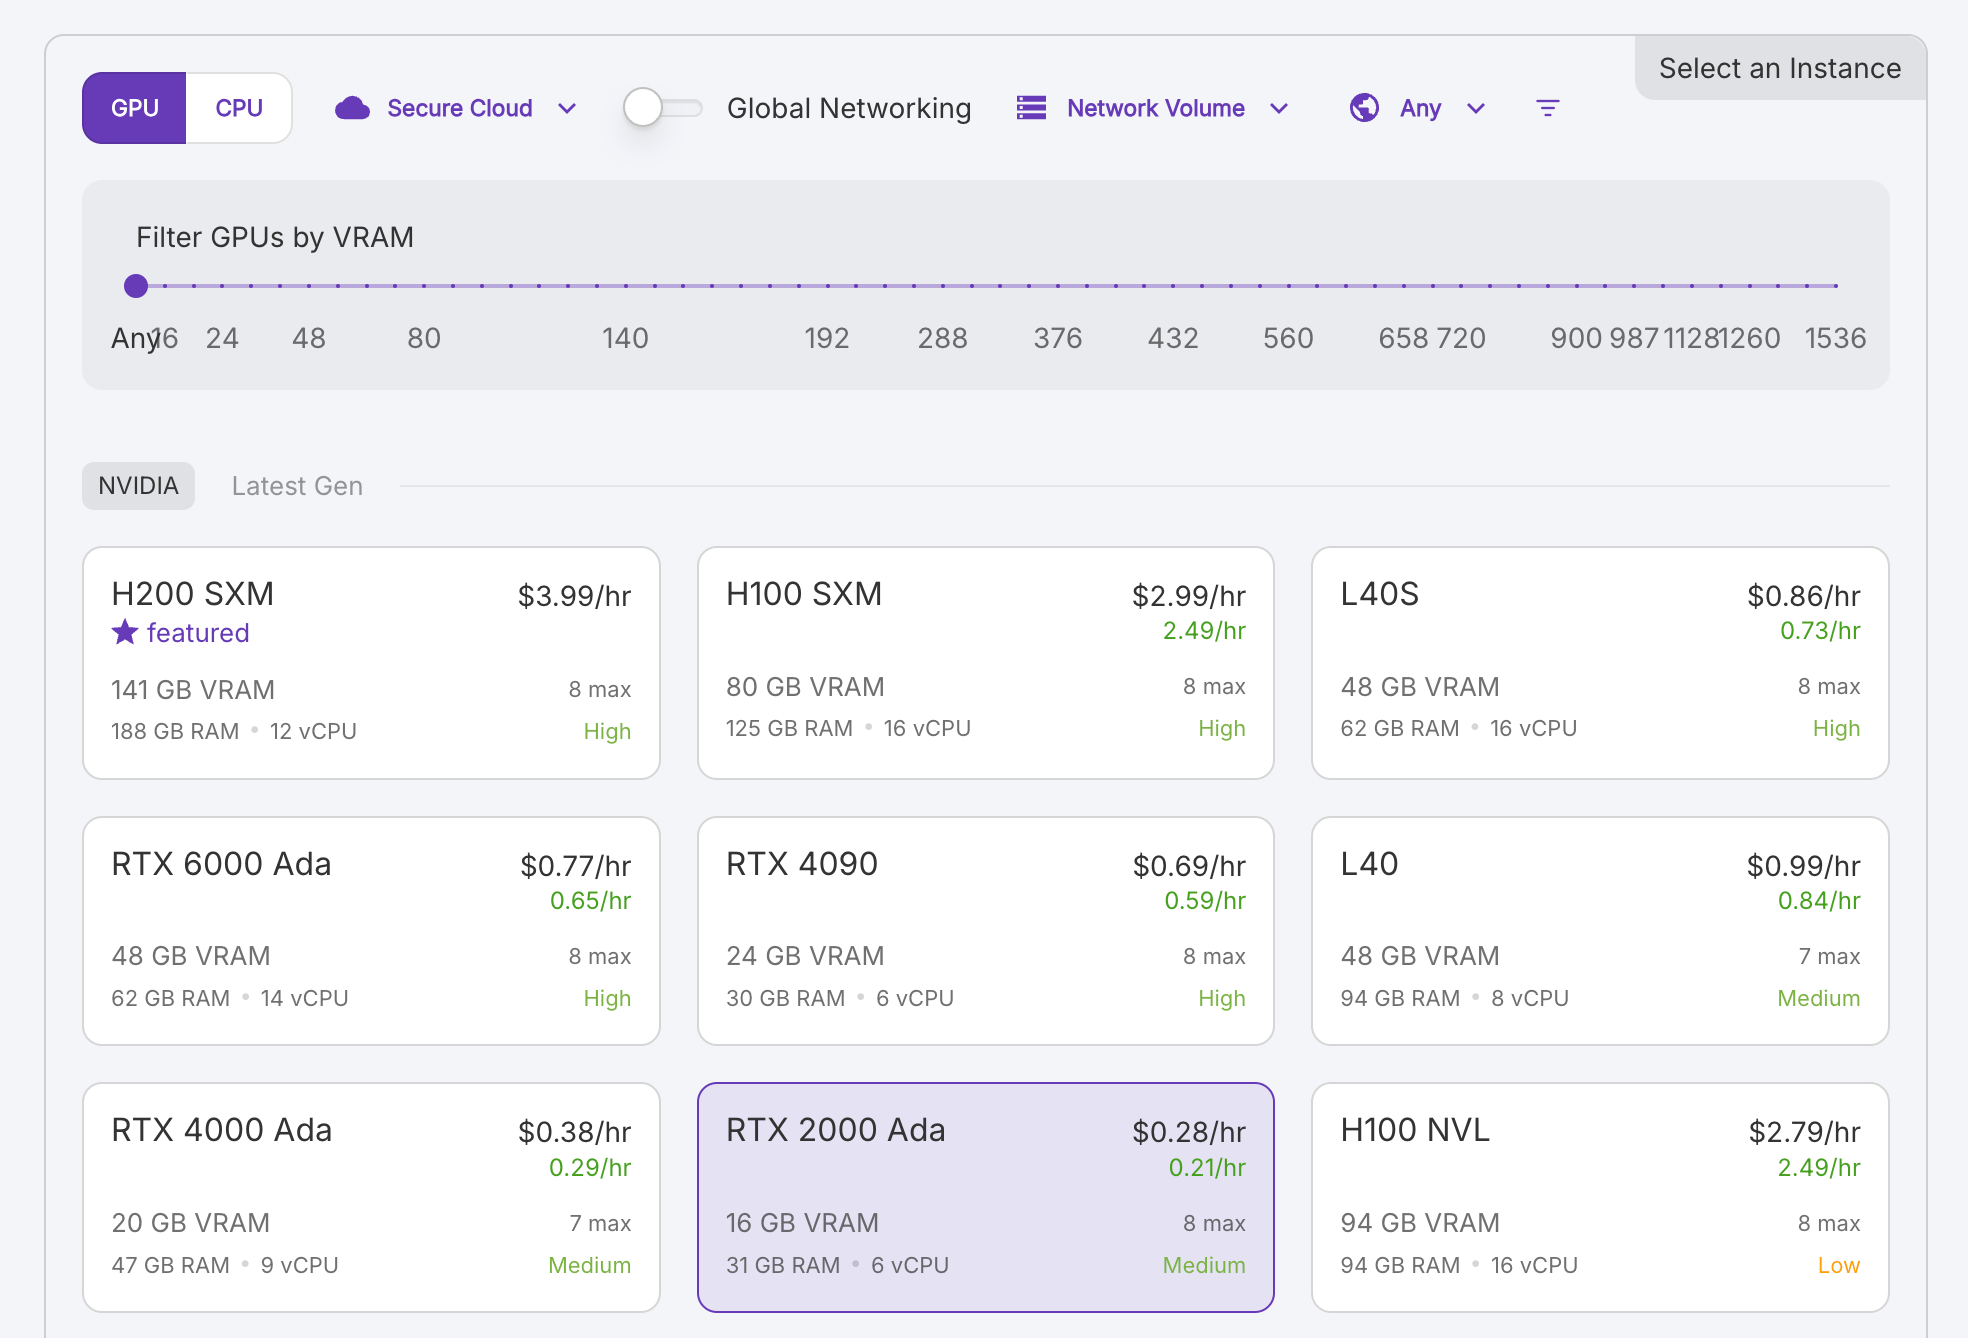 4. In the **Pod Name** field, enter the name **"test-pod"**.
5. Keep all other fields (Pod Template, Instance Pricing, and GPU Count) on their default settings.
6. Click **Deploy On-Demand** to deploy and start your Pod. You'll be redirected back to the Pods page after a few seconds.
If you haven't set up payments yet, you'll be prompted to add a payment method and purchase credits for your account.
## Step 3: Execute code on your Pod with JupyterLab
After your Pod has finished starting up (this may take a minute or two), you can connect to it:
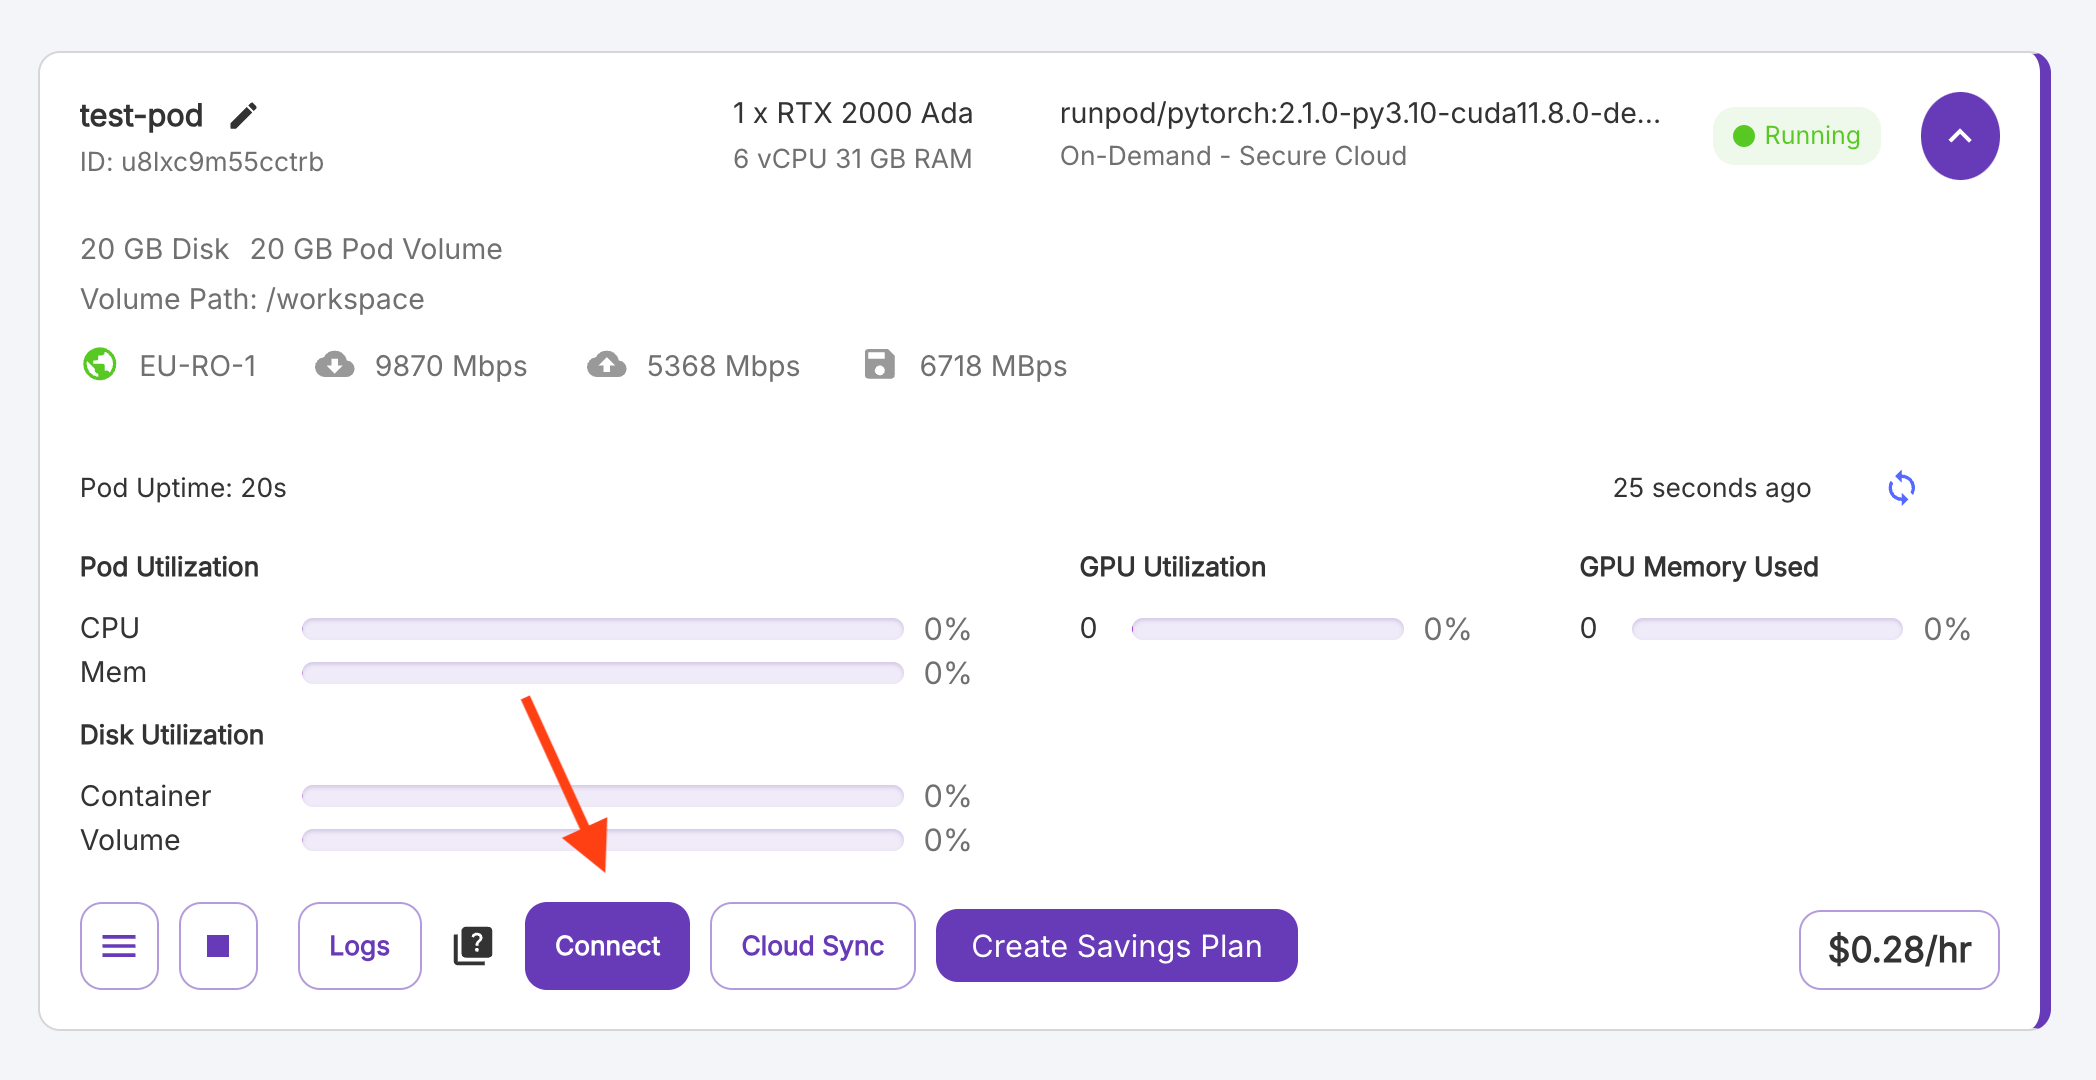
1. On the [Pods page](https://www.console.runpod.io/pods), find the Pod you just created and click the **Connect** button. If it's greyed out, your Pod hasn't finished starting up yet.
4. In the **Pod Name** field, enter the name **"test-pod"**.
5. Keep all other fields (Pod Template, Instance Pricing, and GPU Count) on their default settings.
6. Click **Deploy On-Demand** to deploy and start your Pod. You'll be redirected back to the Pods page after a few seconds.
If you haven't set up payments yet, you'll be prompted to add a payment method and purchase credits for your account.
## Step 3: Execute code on your Pod with JupyterLab
After your Pod has finished starting up (this may take a minute or two), you can connect to it:
1. On the [Pods page](https://www.console.runpod.io/pods), find the Pod you just created and click the **Connect** button. If it's greyed out, your Pod hasn't finished starting up yet.
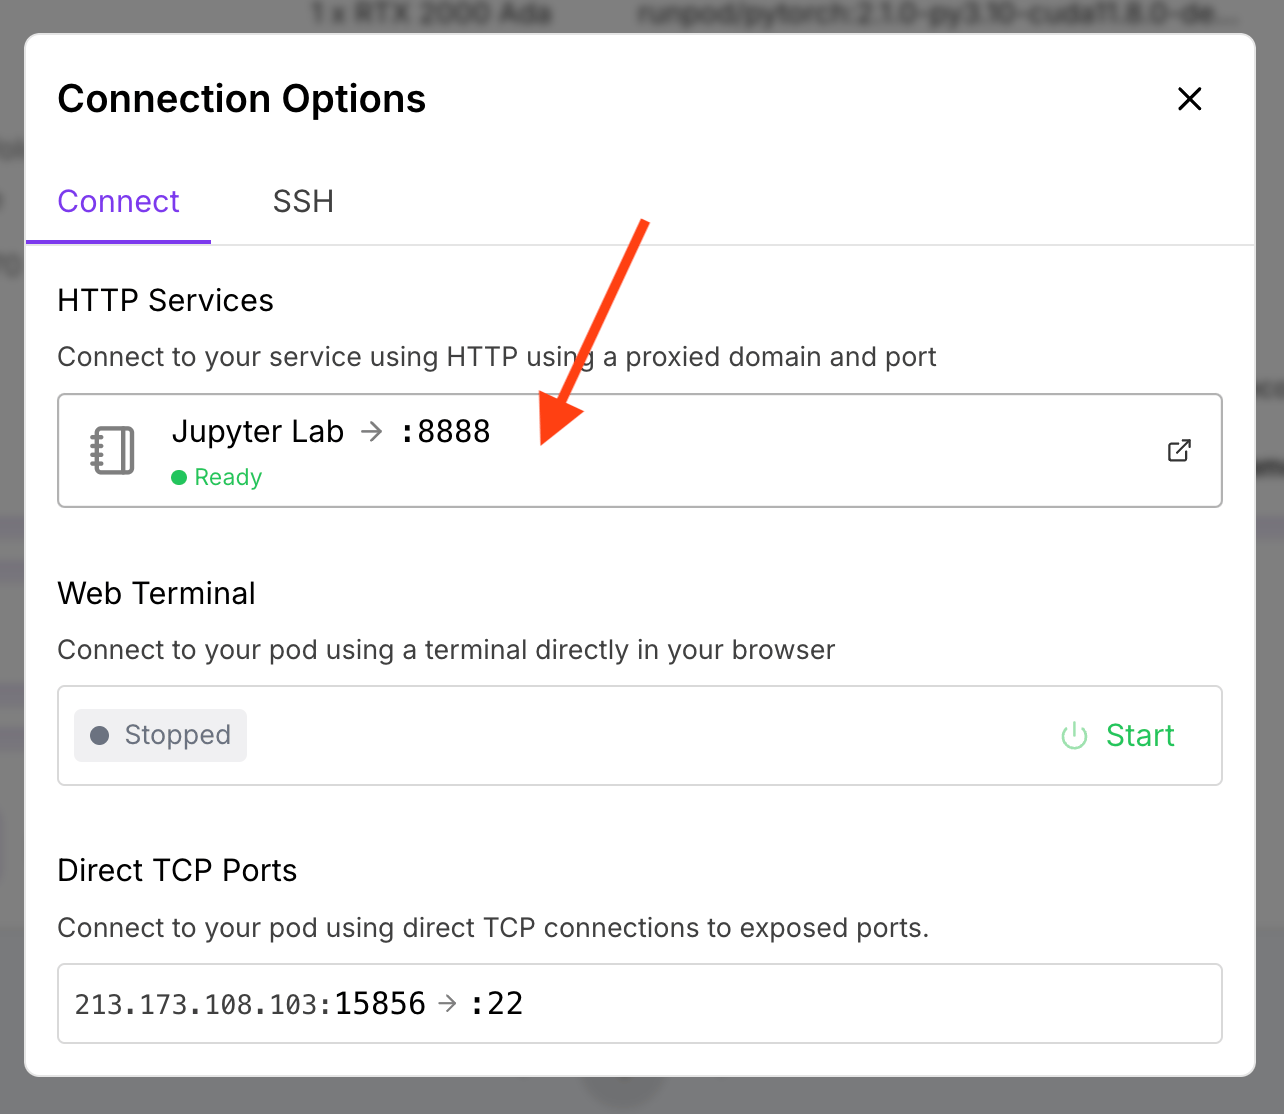
 2. In the window that opens, under **HTTP Services**, click **Jupyter Lab** to open a JupyterLab workspace on your Pod.
 3. Under **Notebook**, select **Python 3 (ipykernel)**.
4. Type `print("Hello, world!")` in the first line of the notebook.
5. Click the play button to run your code.
Congratulations! You just ran your first line of code using Runpod.
## Step 4: Clean up
To avoid incurring unnecessary charges, make sure to:
1. Return to the [Pods page](https://www.console.runpod.io/pods).
2. Click the **Stop button** (square icon) to stop your Pod.
3. Confirm by clicking the **Stop Pod** button.
You will be charged for storage on stopped Pods. If you don't need to retain your Pod environment, you should terminate it completely.
To terminate your Pod:
1. Click the **Terminate** button (trash icon).
2. Confirm by clicking the **Yes** button.
Terminating a Pod permanently deletes all data that isn't stored in a [network volume](/pods/storage/create-network-volumes). Be sure you've saved any data that you want to access again.
## Next steps
Now that you've learned the basics, you're ready to:
* Generate [API keys](/get-started/api-keys) for programmatic pod management.
* [Connect to Runpod](/get-started/connect-to-runpod) using the [REST API](https://rest.runpod.io/v1/docs) or [command-line interface](/runpodctl/overview) (CLI).
* [Choose the right Pod](/pods/choose-a-pod) for your workload.
* [Manage Pods](/pods/manage-pods) using the web interface and CLI.
* Build production-ready applications with [Serverless](/serverless/overview).
* Explore [tutorials](/tutorials/introduction/overview) for specific use cases.
## Need help?
* Join the [Discord community](https://discord.gg/cUpRmau42V).
* Reach out via [email](mailto:help@runpod.io).
* Submit a request using the [contact page](https://contact.runpod.io/hc/requests/new).
3. Under **Notebook**, select **Python 3 (ipykernel)**.
4. Type `print("Hello, world!")` in the first line of the notebook.
5. Click the play button to run your code.
Congratulations! You just ran your first line of code using Runpod.
## Step 4: Clean up
To avoid incurring unnecessary charges, make sure to:
1. Return to the [Pods page](https://www.console.runpod.io/pods).
2. Click the **Stop button** (square icon) to stop your Pod.
3. Confirm by clicking the **Stop Pod** button.
You will be charged for storage on stopped Pods. If you don't need to retain your Pod environment, you should terminate it completely.
To terminate your Pod:
1. Click the **Terminate** button (trash icon).
2. Confirm by clicking the **Yes** button.
Terminating a Pod permanently deletes all data that isn't stored in a [network volume](/pods/storage/create-network-volumes). Be sure you've saved any data that you want to access again.
## Next steps
Now that you've learned the basics, you're ready to:
* Generate [API keys](/get-started/api-keys) for programmatic pod management.
* [Connect to Runpod](/get-started/connect-to-runpod) using the [REST API](https://rest.runpod.io/v1/docs) or [command-line interface](/runpodctl/overview) (CLI).
* [Choose the right Pod](/pods/choose-a-pod) for your workload.
* [Manage Pods](/pods/manage-pods) using the web interface and CLI.
* Build production-ready applications with [Serverless](/serverless/overview).
* Explore [tutorials](/tutorials/introduction/overview) for specific use cases.
## Need help?
* Join the [Discord community](https://discord.gg/cUpRmau42V).
* Reach out via [email](mailto:help@runpod.io).
* Submit a request using the [contact page](https://contact.runpod.io/hc/requests/new).